Source: http://mobile.tutsplus.com
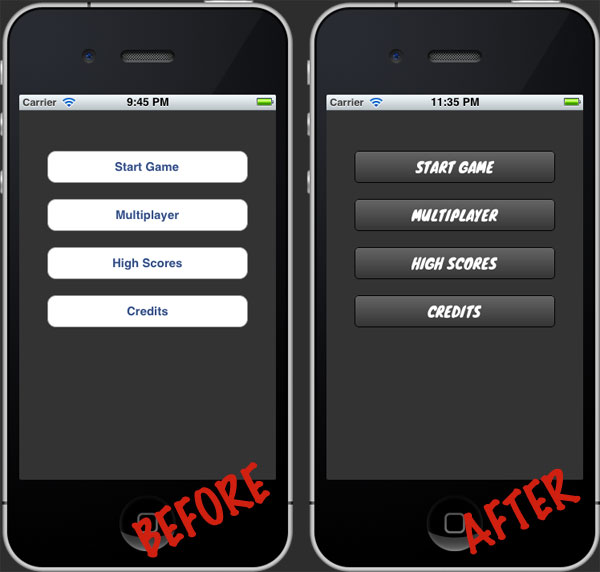
Project Preview
Project Setup
In the download that accompanies this tutorial, you’ll find folders entitled “Initial Build” and “Final Build”. Rather than showing all the steps necessary to setup the initial project, you should simply download the attachment and follow along using the project from the “Initial Build” folder.With the initial project open, go to the ViewController.m file and locate the
for loop within the viewDidLoad method. The code snippets from the tips below should be placed within this loop. Tip #1: Tweak Colors & Gradients
The most fundamental step toward customizing theUIButton
class is to adjust the color of the background and title for both the
default and highlighted states. The following code snippet sets each
button’s background color to black, normal title color to white, and
highlighted title color to red:
1
2
3
4
5
6
| // Set the button Text Color[btn setTitleColor:[UIColor whiteColor] forState:UIControlStateNormal];[btn setTitleColor:[UIColor redColor] forState:UIControlStateHighlighted]; // Set the button Background Color[btn setBackgroundColor:[UIColor blackColor]]; |
setBackgroundColor: message above with the following to create a custom gradient:
1
2
3
4
5
6
7
8
| // Draw a custom gradientCAGradientLayer *btnGradient = [CAGradientLayer layer];btnGradient.frame = btn.bounds;btnGradient.colors = [NSArray arrayWithObjects: (id)[[UIColor colorWithRed:102.0f / 255.0f green:102.0f / 255.0f blue:102.0f / 255.0f alpha:1.0f] CGColor], (id)[[UIColor colorWithRed:51.0f / 255.0f green:51.0f / 255.0f blue:51.0f / 255.0f alpha:1.0f] CGColor], nil];[btn.layer insertSublayer:btnGradient atIndex:0]; |
NSArray is created with the
initial and target gradient colors. Note that the corresponding RGB
values must be divided by 255 before being supplied to the colorWithRed:green:blue:alpha: message and that an alpha value of 1.0 represents fully opaque while an alpha value of 0.0
represents fully transparent. Unfortunately, a full explanation of the
“magic” above is beyond the scope of this tutorial, but the important
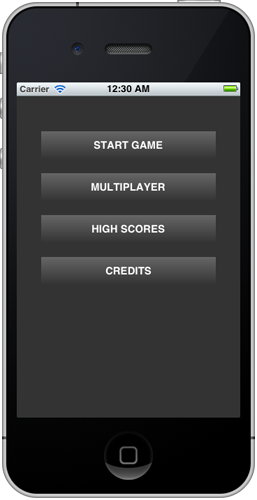
thing to remember is to that you simply need to replace the RGB values
with the begin/end values you want to use in your own custom gradient.If all went well, your menu should now look something like this:
Tip #2: Round the Corners
Next we want to add a custom corner radius to eachUIButton in order to make things look a bit more sleek. Insert the following lines of code to make this happen:
1
2
3
4
| // Round button cornersCALayer *btnLayer = [btn layer];[btnLayer setMasksToBounds:YES];[btnLayer setCornerRadius:5.0f]; |
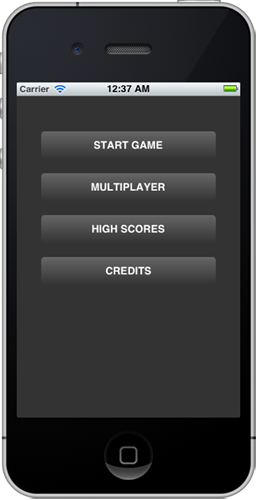
You should now have a menu that looks just a bit slicker:
Tip #3: Add a Stroke Border
Sometimes the small tweaks make all the difference. Add a 1px, black stroke around each button with the following lines of code:
1
2
3
| // Apply a 1 pixel, black border[btnLayer setBorderWidth:1.0f];[btnLayer setBorderColor:[[UIColor blackColor] CGColor]]; |

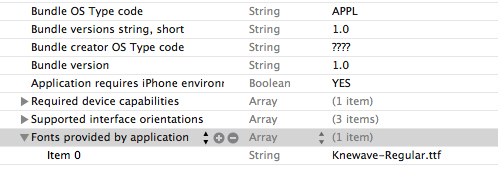
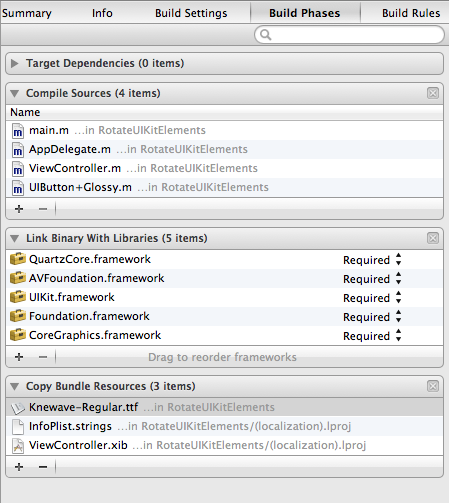
Tip #4: Use a Custom Font
Now let’s try a more noteworthy tweak. The default system font just isn’t cutting it. The game menu we’re building needs a font that can match the visual aesthetic of the game. A quick search on Google Fonts reveals just a font called Knewave by Tyler Finck that should do the trick. Download Knewave now.After downloading the Knewave-Regular.ttf file, you’ll need to drag it into the Project Navigator pane in Xcode to add it to your project. Next, open up the Info.plist file. Add a new property list row and type in “Fonts provided by application”. An array should be created automatically. Set the string associated with Item 0 to “Knewave-Regular.ttf”. Double check the name because the value is case sensitive. Save the file.
viewDidLoad method to set a custom font:
1
2
3
4
5
6
7
8
9
10
| // Set the button Text Color[btn setTitleColor:[UIColor whiteColor] forState:UIControlStateNormal];[btn setTitleColor:[UIColor redColor] forState:UIControlStateHighlighted]; // Add Custom Font[[btn titleLabel] setFont:[UIFont fontWithName:@"Knewave" size:18.0f]]; // Draw a custom gradientCAGradientLayer *btnGradient = [CAGradientLayer layer];btnGradient.frame = btn.bounds; |
fontWithName value is specified as
“Knewave”, not “Knewave-Regular” as you might expect. This is because
there is a difference between the font’s filename and the font’s given
name. You’ll need to be sure you use the given name when working with
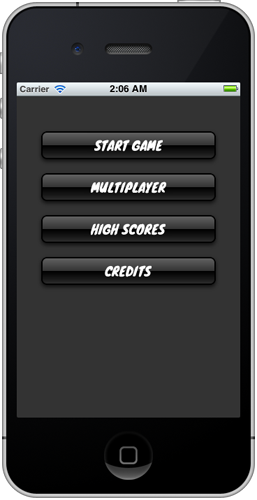
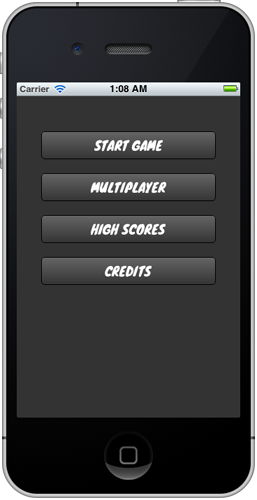
your own fonts. With the above code in place, the game menu should be complete! Build and run now and you should see something like the following:
Tip #5: Optional: Apply a Rotation
While not utilized in the primary design demonstrated by this tutorial, it’s often useful to apply a slight rotation to UIKit elements, particularlyUIButton or UIImage objects. Doing so is simple, and can be done with just one line of code. You can try this out with the code written so far by doing the following:
1
2
3
4
5
6
7
| self.startGameButton.transform = CGAffineTransformMakeRotation(M_PI / 180 * 5.0f); for(UIButton *btn in buttons){ // Set the button Text Color [btn setTitleColor:[UIColor whiteColor] forState:UIControlStateNormal]; [btn setTitleColor:[UIColor redColor] forState:UIControlStateHighlighted]; |
M_PI is divided by 180 to
generate 1 radian, which is then multiplied by 5.0f to result in a
rotation of 5 radians. As you will notice if you build and run the
project, the above is likely to result in anti-aliasing problems with
UIKit elements that are drawn dynamically. Consequently, applying a
rotation is more appropriate with a UIButton when the background image property is set and raster graphics are in use (i.e. this works best with PNG files).Bonus Tip: Use UIButton-Glossy
With the five tips above, you’ve seen how easy it can be to make subtle yet significant tweaks to aUIButton object. However, what if I told you that doing so could be even easier? Meet UIButton-Glossy, an open-source category by George McMullen that automatically applies both a gradient and a glossy finish to UIButton objects. Implementing
UIButton-Glossy in your own project is simple. After you’ve downloaded the UIButton-Glossy.h and UIButton-Glossy.m files and added them to your Xcode project, import the *.h file in the main project view controller, like this:
1
2
| #import "ViewController.h"#import "UIButton+Glossy.h" |
[btn makeGlossy];. To see this in action, replace the existing view controller code with the following:
1
2
3
4
5
6
7
8
9
10
11
12
13
14
15
| for(UIButton *btn in buttons){ // Set the button Text Color [btn setTitleColor:[UIColor whiteColor] forState:UIControlStateNormal]; [btn setTitleColor:[UIColor redColor] forState:UIControlStateHighlighted]; // Set default backgrond color [btn setBackgroundColor:[UIColor blackColor]]; // Add Custom Font [[btn titleLabel] setFont:[UIFont fontWithName:@"Knewave" size:18.0f]]; // Make glossy [btn makeGlossy];} |